Thursday, October 18, 2012

Ornament Topiary

Hello Friends
Today I wanted to share with you all this ornament tree topiary that I made. I have seen these in stores but they always were to pricey and I didn't want to pay to much for it. So I decide to make my very own and wanted to share with you how I did it. It was a bit challenging but then I figure a way on how to cover it so it won't show the form and look nice.

The supplies you will need!
Styrofoam Cone
Ornament ball in varies of sizes in your choice of color
Hot Glue Gun
Glue ( I used Mod Podge glue)
Foam Paint Brush
Big bottle of glitter also in your choice of color

First gather all your supplies and start gluing the cone. On the second image you will see that I did not glue it and started adding the balls but after I had done the whole things it had shown to much gaps and the form was showing to much, so at that time I decide to add glitter to it. This was really hard because I had finish the entire cone by adding and hot gluing the balls together. So as you see from my mistake go on and glue and glitter your cone before you add your balls. Let the glitter dry over night!


This image shows you the way I did it at first, if you don't want to bother with glitter you will start by adding your balls in the sizes that you want to use. I first gather my balls and start pushing them into the foam all around to see how it looks then I take the balls out one by one and start hot gluing them on one by one. You can also spray paint or paint your cone if you don't want to use glitter. I like the glitter better cause I like Bling!!!

See here how you can see the foam I didn't like that. That's why I  glitter it and boy was it hard because I should of done this at the beginning of the project. Hey we all learn from our mistake LOL!

 Here is the finish look after I glitter it all which was so time consuming and hard cause you didn't want to add glue to your balls, I used a tiny paint brush and it work out.
 Learn from my mistake 
GLUE AND GLITTER YOUR CONE FIRST!


 You will glue the cone in steps then add your glitter. 
What I did I glue the cone half way then glitter it and then I did the other half.
 Sorry I forgot to take picture's of this process!

 This is the finish look what do you think!


Hope you all enjoy and thanks for stopping by!
Hugs and Blessing
 ~Maggie~

Thursday, October 11, 2012

Project Change and Christmas Finds!

Hi Everyone 
Well today I wanted to share with you all some great finds I found a few weeks ago with my mom at the Christmas Tree Store and Ross also the changes I did on the reindeer's that I found.
 Hope you all will enjoy! 
I know it's early for Christmas but it's my favorite favorite time of the year!

Let me start by showing you these adorable book boxes from the Christmas Tree Shop and they were really cheap!
You can stack and place them any where
 you want and they will look cute! The Dear Santa was $3.99 and the I Believe in Santa was only $2.99 so what you think about that!


Then I also found these cute gift box ornament but they are really nice in size and you can use them for Christmas decor around the house and these stack-able boxes!


Yes did I mention they were only $2.99!

Aren't these boxes cute! 

I love the the whole box it has details from
the inside and outside of the box!

$1.29, $1.00, and the little one 69 cents. They even had
bigger one but I choose to keep it on the smaller sizes!

Now let talk about Reindeer's!
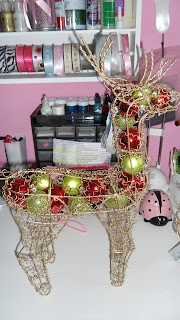
I found these cute little guys at Ross but I was not really impress with the green ornament balls that it had. So a light ball switch went on and I decided to swap out the green ball to the lime green ball what do you think! I like the lighter color green and that's the color i'm going for this Christmas season! 

This is the green balls that it originally had. Caution ladies it's very messy and time consuming! All the glitter start to fall when your taking the wire apart. But it was worth it to me LOL! The standing tall one was $6.99 and the feeding one was $4.99!
Original Look!
I forgot to take picture of both.

Closer View!


Ah now the new look!

Closer Look!


So what do think!
Have a blessed week and many hugs and blessing!
~Maggie~


Monday, October 1, 2012

Pink-a-licious WINNER!

Hello My Sweet Blog Friends,
Sorry that I didn't post yesterday but I have been a little under the weather! I will like to welcome all my new pink-a licious follower and thank everyone who enter in my fall-a licious giveaway! I  really appreciate all your sweet comment and thank you all for following me. Ok let get on to the WINNER!

The Lucky Pink-a-licious Winner is Kimberly Sminkey from Tiaras & Bowties!
Congratulation Kim! Contact me with your address. 

My Sweet Followers thank you all again and I wish I could have given all a little something who enter but I will have another giveaway soon!
Have A Blessed Day!
 Hugs Maggie!
Related Posts Plugin for WordPress, Blogger...